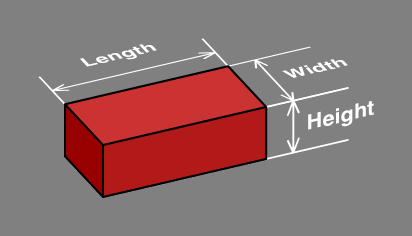
Section 1. Bricks have been used as a building material for thousands of years. Although bricks can be produced in many shapes, rectangles have come to predominate, likely because they are convenient for design, manufacture and installation. Many sizes of rectangular bricks are available, but this report concentrates on those whose length is three times the width; the height is not critical. The 3:1 ratio explains why the title of this page is long bricks, as most have a length:width ratio of only 2:1.
| Figure 1A | |
|---|
Because a layer of mortar (a joint) is presumed between bricks, one must contrast the nominal size of a brick with its slightly smaller actual size. The nominal size is what an architect will use when calculating how many bricks will be needed for a project, but the actual size is what the brick factory delivers. The usual joint is three-eighths of an inch in the United States versus ten millimeters elsewhere, which two distances are practically the same. The difference between the nominal and actual sizes is equal to the thickness of the standard joint.
The joint size can vary by a millimeter or two without sacrificing structural integrity, and this fact gives the bricklayer some flexibility in aligning the bricks. Further, the sizes of the bricks themselves can fluctuate by a similar amount. Bricks are not an exact building material.
The table below gives some standard brick sizes that have the length:width ratio 3:1.
| unit | length | width | height | sometimes called | |||
|---|---|---|---|---|---|---|---|
| nominal | actual | nominal | actual | nominal | actual | ||
| inches | 12 | 11 5/8 | 4 | 3 5/8 | 2 | 1 5/8 | roman |
| 12 | 11 5/8 | 4 | 3 5/8 | 2 2/3 | 2 7/24 | norman | |
| 12 | 11 5/8 | 4 | 3 5/8 | 3 1/5 | 2 33/40 | engineer norman | |
| 12 | 11 5/8 | 4 | 3 5/8 | 4 | 3 5/8 | utility | |
| millimeters | 300 | 290 | 100 | 90 | 67 | 57 | |
| 300 | 290 | 100 | 90 | 100 | 90 | ||
| notes:
– 2 7/24 is usually rounded to 2 1/4. – 2 33/40 is usually rounded to 2 13/16. – The names of brick sizes are by no means standardized. | |||||||
The standard United States size 4in equals 101.6mm, which is so close to the standard metric size 100mm that the two are interchangeable for most applications; this relationship is conveniently captured by the approximately-equal-to sign: 4in ≈ 100mm. Discussions below assume the proportions of the first brick in the table, 3:1:1.
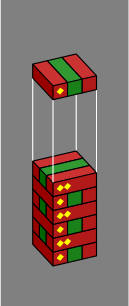
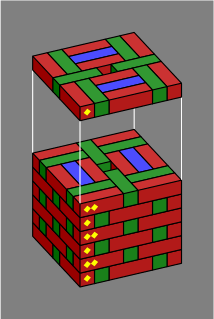
Figure 1B shows a basic straight wall built with long bricks in Flemish bond. One corner is cut away to help show how the bricks fit together.
| Figure 1B | 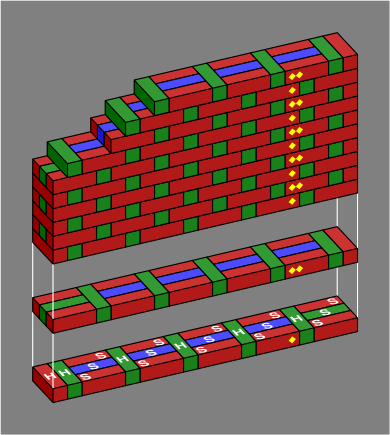 |
|---|
The bottom two courses (horizontal layers) are exploded to show their design in full. Bricks parallel to the length of the wall are stretchers, and are marked with the letter S in the bottom course, while perpendicular bricks are marked H for header. Each course is marked with one yellow diamond (for an odd course) or two (for an even course); these markings show how courses are repeated. There is no intrinsic difference between odd and even courses — rather, one course is arbitrarily declared odd, and the rest follow. Like most brick walls, this one has only two different courses, but a larger number is possible.
Bricks colored blue are entirely interior to the wall and might be omitted, depending on how strong the wall needs to be. Red and green bricks are mandatory, at least in an ordinary wall; one reason for their color difference is that it makes the diagrams easier to read, and another more subtle reason will be revealed in section 6 below. Although the red, green and blue coloration was adopted for technical reasons, it happens to suggest a decorative pattern for a wall built with multicolor bricks.
Because the thickness of this wall equals three times the width of one brick, the wall is said to have three wythes.
The length of this wall is 84in ≈ 2100mm. Walls built in this bond will have a length that is a multiple of 4in ≈ 100mm, but not a multiple of 8in ≈ 200mm.
The gist of Flemish bond is that headers and stretchers alternate within each course, and each header lies over the midpoint of the stretcher below it. Flemish bond is more frequently built using bricks with the length:width ratio 2:1, but this choice requires that fractional bricks be used at corners and the ends of walls. With the 3:1 bricks, a wide variety of walls is possible without cutting bricks, which is an expensive operation.
The bond illustrated in figure 1B has the same topology as rat-trap bond. The reason for the present page is that rat-trap bond, in the few places it is mentioned, receives only cursory treatment; yet rat-trap is capable of considerable development.
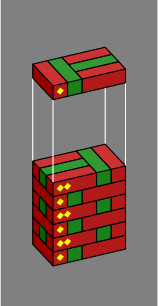
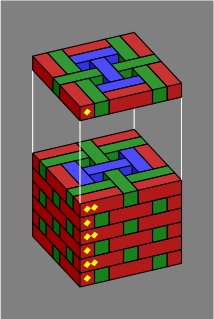
Section 2. Figure 2A shows the same wall as figure 1B, except that the corner has been filled in, the exploded courses have been removed, and the optional blue bricks are gone.
| Figure 2A | 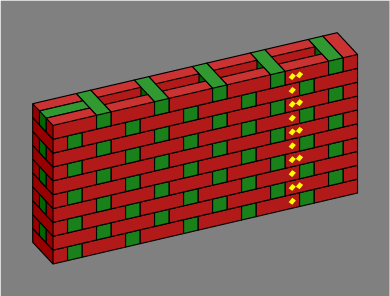 |
|---|
An overhead view of this wall reveals cavities, shown in white, that run from top to bottom:
| Figure 2B | 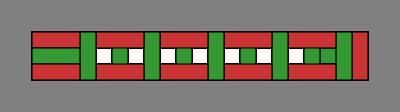 |
|---|
Three ways to reinforce this hollow wall against shear and buckling are:
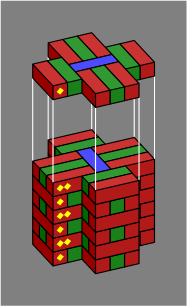
Figure 2C shows one way to arrange the vertical bricks. Red stretchers on the front of the wall have been removed from the drawing to allow viewing inside. Also, the angle of projection has been changed somewhat from that of figure 2A to reduce the apparent overlap of bricks.
| Figure 2C |  |
|---|
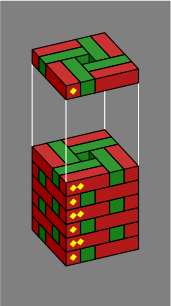
Importantly, the joints between two vertical bricks in one column do not always line up with the joints in another column; this reflects the bricklaying principle that joints should be offset as much as possible to increase strength. The blue stretchers were included at the bottom of the wall in order to make this happen. Figure 2D for clarity shows more periods of the pattern.
| Figure 2D | 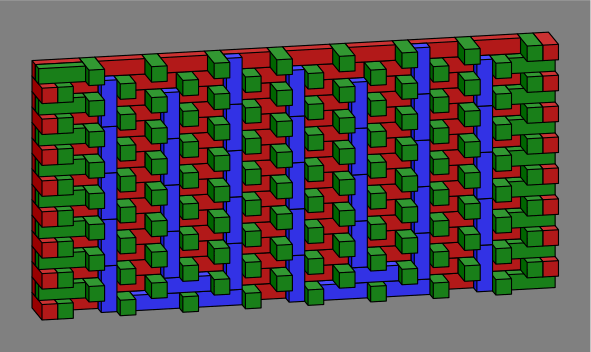 |
|---|
As pictured, only about half the vertical cavities are filled, but the remainder can easily be addressed in similar fashion.
Figure 2E is an orthogonal projection of the side of the wall from figure 2A. The dotted yellow lines show three different directions in which reinforcing rods can be placed within the wall, when the blue bricks are omitted. This arrangement might be especially useful where a wall spans a long gap.
| Figure 2E |  |
|---|
Section 3. The ell, as shown on the left in figure 3A, is easy to construct. Two right angles in great proximity yield a shift, as in the center of the figure.
| Figure 3A | 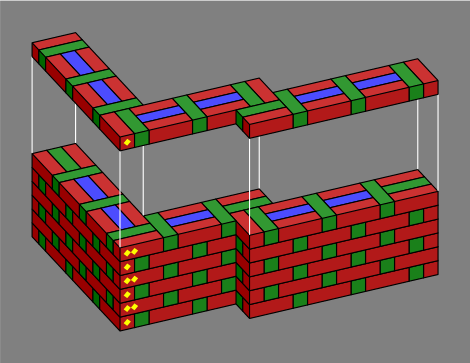 |
|---|
In this and later diagrams, internal bricks are rendered as ordinary stretchers. Next, figure 3B shows a tee and crossing. In this crossing, parallel arms are aligned.
| Figure 3B | 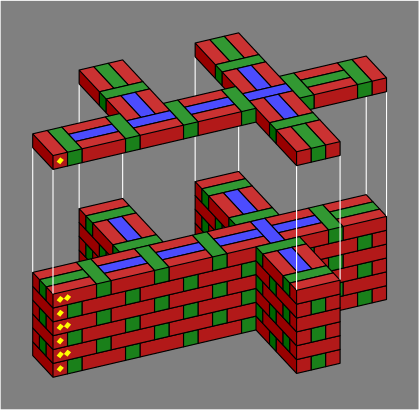 |
|---|
Figure 3C shows two more crossings. Within the crossing on the left, one pair of walls is offset; on the right, both are. Further, the arrangement on the right has a void in the middle that could be filled with reinforcement.
| Figure 3C |  |
|---|
Within Figure 3D the junction at left, which is also a double offset, does not work in long-brick Flemish bond; in yellow are bricks that would need to be 20in ≈ 500mm long. One workaround is shown on the right. Another option is to cut two 12in ≈ 300mm bricks to 10in ≈ 250mm and place them end to end.
| Figure 3D |  |
|---|
Section 4. A variety of pillars can be built without splitting bricks. Within figure 4A:
| Figure 4A | 1 | 2 | 3 | 4 |
|---|---|---|---|---|
| 
| 
| 
|
These two rather stout pillars are the same on the outside, but not on the inside:
| Figure 4B | 1 | 2 |
|---|---|---|
 | 
|
A pilaster is a vertical section of wall thickened for strength or appearance. Here are two simple pilasters:
| Figure 4C |  |
|---|
A pilaster may also be of compound design:
| Figure 4D |  |
|---|
Although not shown, pilasters may easily be placed back to back, or at corners.
Section 5. Nearly all walls have openings for doors, windows or ventilation.
Figure 5A shows some openings which because they are so narrow do not require any special structural treatment. Example 1 is the smallest opening possible. Example 2, although taller, is still the minimum width which is 4in ≈ 100mm with bricks of typical size. Example 3, shaped like a plus sign, shows the limited extent of corbeling possible with Flemish bond; any greater span would be unstable.
| Figure 5A | 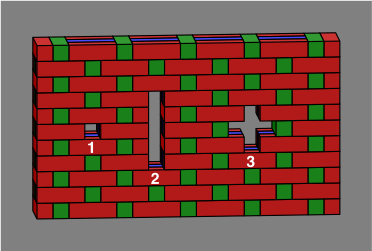 |
|---|
Some openings are of widths that, like example 1 within figure 5B, lie asymmetrically within the bond. Others, like example 2, have a symmetric placement.
| Figure 5B |  |
|---|
The table below, which assumes a nominal brick width of 4in ≈ 100mm and length of 12in ≈ 300mm, shows some widths of opening that are symmetric or asymmetric. Note that an increase of 16in ≈ 400mm does not affect symmetry.
| Symmetric | 4in ≈ 100mm | 20in ≈ 500mm | 36in ≈ 900mm | 52in ≈ 1300mm |
|---|---|---|---|---|
| Asymmetric | 12in ≈ 300mm | 28in ≈ 700mm | 44in ≈ 1100mm | 60in ≈ 1500mm |
The possible widths of opening happen to equal the possible lengths of wall.
In figure 5B, the bricks over the openings require some sort of support, as mortar has little tensile strength. One popular system, which has the advantage of not disturbing the visible bond pattern, is to place an angled metal lintel within the wall. Another way is to use a reinforced concrete beam long enough to span the opening, as rendered in yellow in figure 5C. A similar beam can also be used as a sill, although for this purpose it might need a sloped surface for draining water away.
| Figure 5C | 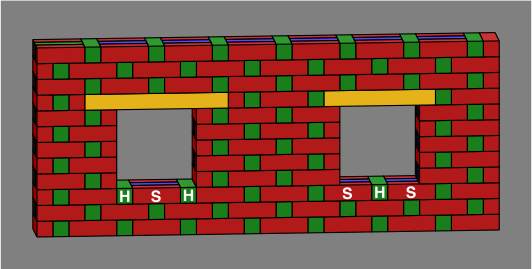 |
|---|
Somthing else to note in figure 5C is that although both windows are the same size, and both are placed symmetrically within the Flemish bond, they are in different phases relative to the bond, as evidenced by the different locations of headers and stretchers at the bottoms of the windows.
Figure 5D shows a traditional treatment using vertical bricks, rendered in brown. These might be supported on an angled metal lintel, or constructed as in an integral reinforced beam.
| Figure 5D | 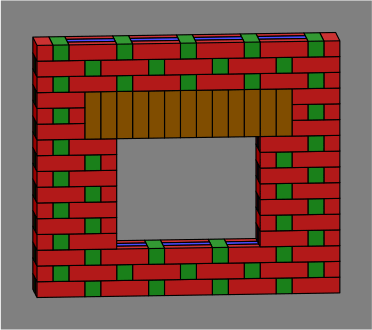 |
|---|
Section 6. A virtue of Flemish bond with long bricks (length:width equals 3:1) is that, with careful design, an entire network of walls can be built without requiring exceptions to the bond pattern at any junction of walls.
The architect should consider a square grid based upon the nominal size of the bricks. The grid size should be twice the width of a brick, or equivalently two-thirds of its length. For instance, if bricks are 12in × 4in, the grid size should be 8in. If instead the bricks are 300mm × 100mm, the grid size should be 200mm.
Essential is that the centerline of every wall should lie on a grid line, as in figure 6A, which shows in overhead view the odd and even courses of a complicated system. Observe that the wall's centerline, which is marked with a dotted line, never touches a red brick. By contrast, the centerline does touch every green or blue brick.
| Figure 6A | 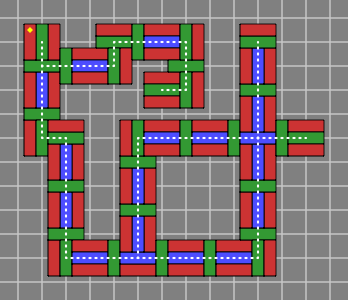 | 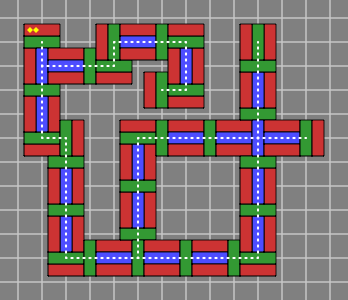 |
|---|
If the bricklayer chooses to start work at one point and extend the network from that point one brick at a time, no difficulty should be encountered.
On the other hand, if the bricklayer needs to start with several disconnected sections and fill the gaps later, care is required to ensure that the disconnected sections arein phase, or they will not join properly. Figure 6B, which shows the odd course of a brick wall that is supposed to become a complete box, reveals what can go wrong. Each of the left segment and the right segment is correct in itself, but the two segments are out of phase with each other, and will not connect according to the rules of Flemish bond.
| Figure 6B | 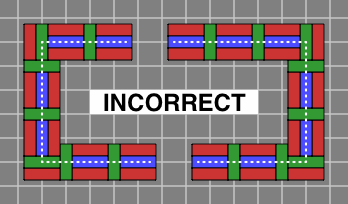
|
|---|
Figure 6C shows two different unsuccessful attempts to connect the segments; the even course laid on top of this one will fail in the same way.
| Figure 6C | 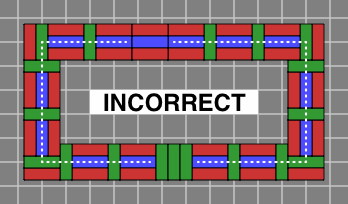
|
|---|
By the same token, if the first course is laid correctly, the other courses will fall into place with little difficulty.
Here is a method of ensuring correct phasing. Figure 6D is like 6A except that the red bricks and centerlines have been removed:
| Figure 6D | 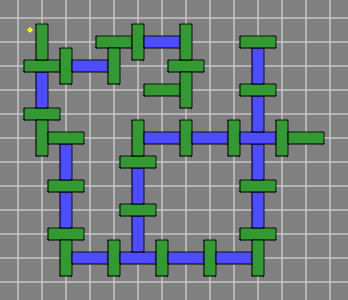 | 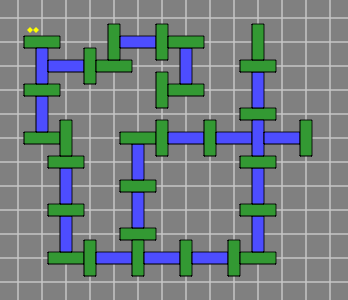
|
|---|
In figure 6E, the underlying white grid has been replaced with a basketweave pattern, which differs in the odd and even courses. Observe that the green and blue bricks are in phase with the basketweave — this is essential:
| Figure 6E | 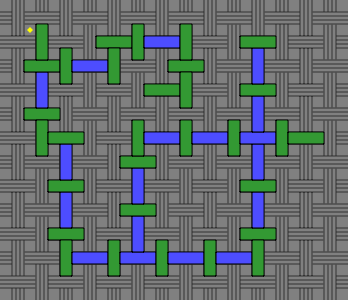 | 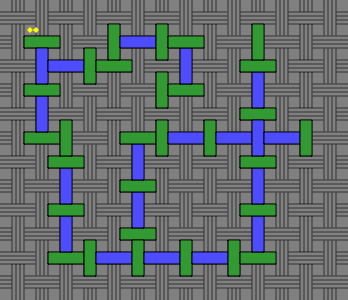
|
|---|
Occasionally, there is a correctly-phased wall that still does not work, as exemplifed in figure 3D.
Section 7. One way to change Flemish bond is to omit some headers and close the gap, as in figures 7A, 7B and 7C:
| Figure 7A |  |
|---|
| Figure 7B | 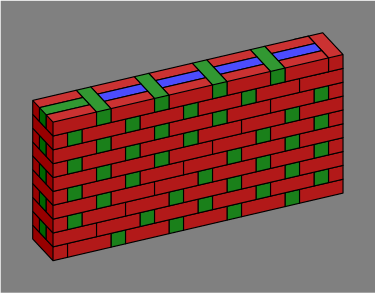 |
|---|
Header omission also enables, without cutting bricks, the inclusion of glass blocks which are typically 8in ≈ 200mm square:
| Figure 7C | 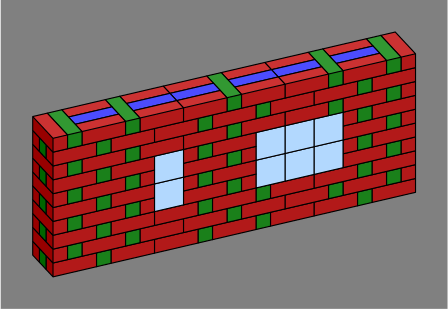 |
|---|
Brick omissions such as these disturb the phasing of the bond. By contrast, vertical bricks when installed as in figure 7D avoid this difficulty:
| Figure 7D | 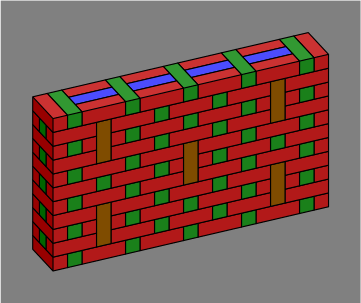 |
|---|
Courses need not all be the same height. A manufacturer that offers a brick 4in ≈ 100mm high probably also makes a brick two-thirds as high, 2.67in ≈ 67mm:
| Figure 7E |  |
|---|
The figures were prepared with Adobe PostScript, the grande dame of programming languages for graphics.