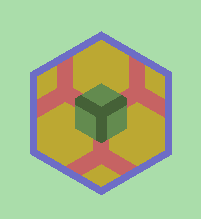
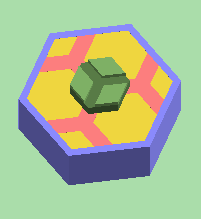
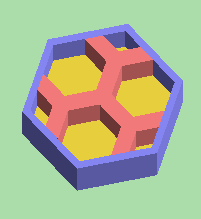
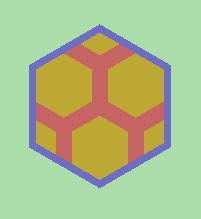
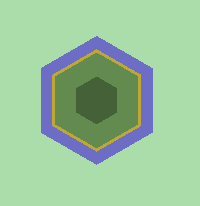
namely H1_S1_D0, drawn at the default scale
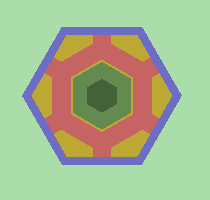
make the structure of the brick clearer
It is important to acknowledge Jeff Epler's earlier work in this area.
§1. Introduction. This page presents an implementation of the hexagonal toy brick system suitable for three-dimensional printers. People involved might be called laterculators; the process, laterculation.
| figure 1A | |
| several OpenSCAD views of a simple brick,
namely H1_S1_D0, drawn at the default scale | |
|---|---|
|
|
|
| top | upper |
|
|
|
| lower | bottom |
| the coloring is artificial, in order to
make the structure of the brick clearer | |
There are three systems: H-bricks, Y-bricks, and P-bricks. Bricks from one will fit the others, but they are very different in nature. (Audacious designers can produce hybrids, which are only glimpsed in this report.) Beginners, especially children, are urged to start with the H-bricks. Accordingly, the H-bricks will be explained first. The Y-bricks are explained later on this page, with the P-bricks after that.
A comprehensive and convenient notation for all possible bricks has yet to be found; see polyhex for a glimpse into the wealth of configurations. Still, the system described here is of benefit for simpler bricks, which are the ones most likely to be produced.
Each H-brick has a notation in the form Hh_Ss_Dd, where:
The notation for Y-bricks is the same as for H-bricks, except to change the first letter: Yh_Ss_Dd. By the same token, P-bricks are designated Ph_Ss_Dd. A hybrid brick starts with M.
If an H- or P-brick's designation includes the subsymbol D0, all its complete hexagons lie in a straight line. For a Y-brick, the complete hexagons will lie in an "essentially" straight line.
§2. Some technical matters. OpenSCAD programs and their STL outputs can be downloaded for the bricks which appear in the schematic images below and on linked pages. Everyone is welcome to download the code, modify it, print lots of bricks, and redistribute the altered or unaltered code. Author's opinion: Open-source software is always to be encouraged.
Users who want to print the bricks without changes can send the .stl file directly to a slicer, while those who prefer to customize the brick can load the .scad files into OpenSCAD and modify them as desired. Everyone will benefit from examining file include_1.scad before producing any bricks.
With the default values:
In general, the images on this page are not to scale, because the user can vary the dimensions of various aspects of the bricks over a wide range. Relationships among the x and y dimensions are critical, but the formulas in the OpenSCAD code will manage the calculations. By contrast, the z dimensions are quite flexible, and are independent of the x and y dimensions. For instance, it is entirely feasible that within a set of bricks some are be single-height and others double-height, everything fitting without complication.
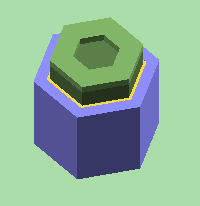
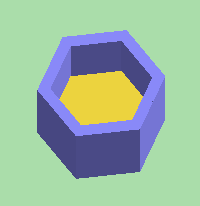
Most of the images on these pages are schematic in the sense that in a real brick, the studs are on the top and the inner walls are on the bottom, so that both could not be fully viewed simultaneously. Color usage:
About the stud coloring:
The hash marks on the axes represent units called x_step and y_step respectively, and they are not intended to be equal. They are the largest values for which the locations of nearly all components of nearly all bricks can be specified with integers. These two step values were chosen for the convenience of the OpenSCAD programmer. Still, locations can be specified with non-integers whenever desired.
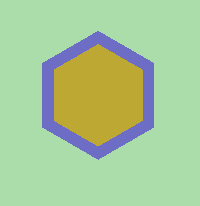
Each diagram is the top rather than the bottom view of a brick; this distinction is essential for chiral pairs. The images' green and red backgrounds are explained later.
§3. Examples of H-bricks. H1_S1_D0 is known as the unit H-brick. Within the downloadable code, it is found in either of these files:
| figure 3A | ||||
| some straight H-bricks | ||||
|---|---|---|---|---|

| 
| 
| 
| |

| ||||

| 
| 
| 
| |

| ||||

| ||||
|
Observation. The three bricks labeled above as H1_S1_D0, H2_S2_D0, and H3_S3_D0 are quite enough to satisfy the needs of many beginners, allowing them to build structures with sturdy intersections (figure A-4a, figure A-8a). A separate but equivalent trio is H1_S1_D0, H3_S2_D0, and H5_S3_D0 (figure D-9). The situation for Y-bricks is more complicated, which is one reason why H-bricks are recommended for novices. Meanwhile, the P-brick equivalent is given in §7 below. |
| figure 3B | |||
| some chiral H-brick pairs
with notes on rotational symmetry | |||

| 
| 
| 
|
| each of these bricks has 180-degree rotational symmetry | each of these bricks has 120-degree rotational symmetry | ||

| 
| 
| 
|
| each of these bricks has 180-degree rotational symmetry | each of these bricks lacks rotational symmetry | ||
| figure 3C | |||
| some miscellaneous H-bricks | |||
|---|---|---|---|

| 
| 
| 
|

| 
| 
| 
|
| acute convexity | acute concavity | a hole in the middle | |

| 
| 
| 
|
| right-angle bricks are possible | |||
These H-bricks plus others are listed in lexicographical order.
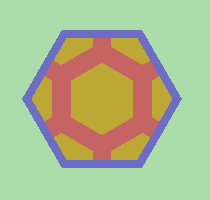
Throughout these pages, those H-bricks that are equivalent to a tessellation of the unit H-brick are drawn on a green background. An example is H6_S5_D1A:
| figure 3D | ||

| 
| 
|
Drawn on a red background are bricks that are not equivalent, such as H7_S5_D1A. Young children who are playing with H-bricks might benefit from a collection limited to the tessellables; they are often simpler to use than the others. On the other hand, advanced users might enjoy the variety that non-tessellables bring.
A gray background is used when tessellability is not established, as in images of partial bricks.
If a collection of tessellable bricks adjoin one another in the natural manner, it is almost inevitable that the hexagonal grid of inner walls will continue from one brick to the next in phase:
| figure 3E (studs omitted) |

|
§4. The conservative subset. Among the possible H-bricks, those chosen for this implementation usually conform to these conservative criteria:
| figure 4A | ||
| some valid, but not conservative, H-bricks | ||
|---|---|---|

| 
| 
|
Many designers will be creative and do things entirely unanticipated by the present author; that is to be encouraged. The OpenSCAD programs provided here allow a stud to be placed, or omitted, over any hexagonal chamber (whence H-bricks and P-bricks); or over any junction of three inner walls (whence Y-bricks). Further, segments of inner or outer walls can be omitted, in some cases conveniently. In that case, the notational system outlined above will not suffice.
A chamber that is less than a full hexagon, such as that formed between inner and outer walls, is not anticipated to have any use. Any stud that would fit it is definitely non-conservative.
§5. OpenSCAD for H-bricks. In the OpenSCAD code, there are 32 render modules sufficient to conveniently form all the H-bricks in the diagrams above, and many others. In that code, letters are often used to represent directions in the xy plane. Their meanings:
| figure 5A |

|
Figure 5B contains the unit H-brick drawn both normally and exploded, with the relevant OpenSCAD code — the complete file — to give an idea of how the render components fit (and slightly overlap) one another:
| figure 5B | |
| file H_bricks/H1/H1_S1_D0.scad | |
|---|---|
|
|
include <../../include_1.scad> render_IA (-1, +1); render_GK (+1, +1); render_KC (-2, 0); render_T ( 0, 0, 1, 1); render_S ( 0, 0, 0); render_EI (+2, 0); render_AE (-1, -1); render_CG (+1, -1); |
| file H_bricks/H1/H1_S1_D0_exp.scad | |

|
include <../../include_1.scad> render_IA (-1.5, +1.5); render_GK (+1.5, +1.5); render_KC (-3.0, 0.0); render_T ( 0.0, 0.0, 1, 1); render_S ( 0.0, 0.0, 0); render_EI (+3.0, 0.0); render_AE (-1.5, -1.5); render_CG (+1.5, -1.5); |
Normally, integers will suffice as arguments to the render modules, but the values are permitted to be non-integers for special purposes, such as exploded diagrams.
Note that a simple brick such as these can be achieved with only nine lines of code. Complicated bricks may require several dozen, but in any case the code is little more than a list of render calls, which themselves can be transformed with OpenSCAD directives such as translate, rotate, and mirror.
The render modules for H-bricks.
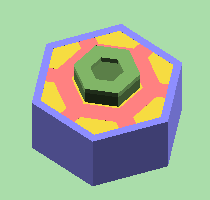
§6. Examples of Y-bricks. The key feature of Y-bricks is that a stud is centered of the junction of three inner walls, as distinguished from H-bricks where the stud is centered over a hexagonal chamber of inner walls. The unit Y-brick is Y3_S1_D0, as shown in figure 6A, and the notion of tessellation follows without surprise.
| figure 6A | |
| several OpenSCAD views of Y3_S1_D0 | |
|---|---|
| 
|
| top | upper |
| 
|
| lower | bottom |
| figure 6B | |||
| some straight Y-bricks | |||
|---|---|---|---|

| 
| 
| 
|
| compare H1_S1_D0 | compare H2_S2_D0 | ||

| |||
| compare H3_S2_D0 | compare H5_S3_D0 | compare H3_S3_D0 | |
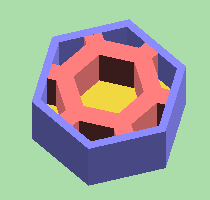
For Y-bricks, the concepts of chirality and rotational symmetry are in principle the same as for H-bricks. However, the relationship between the inner walls and the outer walls adds subtleties. Y-bricks Y9_S3_D1X and Y9_S3_D1Z in figure 6C provide an example. The pattern of their inner walls is chiral, even though their overall footprint, as indicated by their outer walls, is not. This is the reason for the X and Z suffixes on their names.
| figure 6C | |

| 
|
Although Y-bricks Y9_S3_D2 and Y10_S3_D1 in figure 6D have the same overall shape, their inner-wall patterns are so different as to require distinct Y-numbers in their notations; in this case, the X and Z suffixes are not helpful. Together, the two bricks demonstrate how the Y-shaped depressions cut into the studs of Y-bricks can make them easier to use: a user viewing the top of the brick can infer where the walls underneath must be.
| figure 6D | |

| 
|
Adding a stud in the center of each brick (figure 6E) is feasible, making a hybrid brick. Note that the extra stud defeats any strict definition of tessellability.
| figure 6E | |

| 
|
| compare Y9_S3_D2 | compare Y10_S3_D1 |
Figure 6F points out an important contrast between, on the one hand, the H-bricks and P-bricks; and on the other hand, the Y-bricks:
| figure 6F | ||
| unit brick | rotational symmetry | |
|---|---|---|
|
| 
| 60°: all parts |

| 60°: outer wall; overall shape of stud
120°: inner wall; Y-groove in top of stud | |
Figure 6G shows how the rotation of a brick (Y3_S1_D0) can affect whether the hexagonal grid of its inner walls will be in phase with that of an adjoining brick (Y9_S3_D2):
| figure 6G | |
| Y9_S3_D2 and Y3_S1_D0 | |
|---|---|

| 
|
Figure 6H reveals various phase relationships between two like bricks, and between two almost-like bricks:
| figure 6H | |||
| Y9_S3_D2 | Y10_S3_D1 | Y9_S3_D2 and Y10_S3_D1 | |
|---|---|---|---|
| in phase | 
| 
| 
|
| out of phase | 
| 
| 
|
Designers will of course have differing opinions as to whether out-of-phase placements are a good or bad thing.
Lexicographical listings of some Y-bricks and M-bricks.
The render modules for Y-bricks. Their OpenSCAD code works the same as that for H-bricks.
An illustration of how Y-bricks are more complicated than H- or P-bricks.
§7. Examples of P-bricks. P-bricks are like H-bricks in that the stud is centered over a hexagonal chamber. However, with H-bricks, that chamber consists entirely of inner walls, while with P-bricks some of those walls may be outer.
The unit P-brick is P1_S1_D0 (figure 7A), and the notion of tessellation is almost automatic. In overall size, P-bricks tend to be smaller than H-bricks and Y-bricks, but the studs and the chambers they fit into are the same. Hence P-, H-, and Y-bricks can all be used together.
| figure 7A | |
| several OpenSCAD views of P1_S1_D0 | |
|---|---|
| 
|
| top | upper |
| 
|
| lower | bottom |
| figure 7B | ||||
| some straight P-bricks | ||||
|---|---|---|---|---|

| 
| 
| 
| 
|
| compare H1_S1_D0 | compare H3_S3_D0 | |||

| 
| |||
| compare H3_S2_D0 | compare H5_S3_D0 | compare H7_S4_D0 | compare H2_S2_D0 | compare H4_S4_D0 |
|
Observation. A simple set for beginners contains P1_S1_D0, P2_S2_D0, and P3_S3_D0. These three P-bricks can build an equivalent to anything that H1_S1_D0, H2_S2_D0, and H3_S3_D0 can. |
| figure 7C | ||
| some miscellaneous P-bricks | ||
|---|---|---|

| 
| 
|

| 
| |
A P-brick is saturated if every hexagonal chamber has a stud on top.
These and more P-bricks listed in lexicographical order.
The render modules for P-bricks. Their OpenSCAD code works the same as that for H- and Y-bricks.